
Implement a developpment environnement to realize a website with PHP and MySQL

Why implement a developpment environment ?
Firstly, we recommand you work locally, as in directly on your computer. This will ease the learning and understanding of how most PHP and MySQL based applications work, such as WordPress, Joomla, Drupal, PrestaShop, Magento, etc. We need to configure it to make the following work:
- A web server interpreting PHP language
- A MySQL SGBDR to store the data of your application
Therefore, it will be easier to :
- Developp the website (edit templates and CSS files) without having to synchronize your files on a server
- Test plugins and templates without affecting your website when it will be online
- Not be worried about a bad manipulation which could harm your data
Ideally, use a revision control software in order to keep the historic of your website's revisions.
If you have to work in a team, it's an essential tool to set up at the beggining of your project (Subversion, Git).
Finally, if you work on a professionnal project, we suggest you use a bug tracker.
Choose the HTTP server
There are many HTTP servers you can install on your machine. Here's a non-exhaustive list :
Here's a comparative of different HTTP servers.
To start, we recommand you use the HTTP Apache server version 2.X, it's the most common server (netcraft). It has a lot of units and it's certainly one of the most complete in terms of features. Furthermore, it is packaged and ready to use on a lot of operating systems.
With Debian system and derivatives (Ubuntu, etc), here's the command line to install everything you need to make WordPress work :
$ sudo apt-get install apache2 mysql-server php5 php5-mysql phpmyadmin
Once your HTTP server is installed on your computer, you can consult the web page delivered by default by requesting your localhost.
For it, open a web browser and go to http://localhost.

Sometimes, you have to specify the port, when it is different than the one by default (port 80). For example, it's the case for MAMP on MacOS, where you have to use http://localhost:8888.
Configuration of a web server to interpret the PHP language
To make your PHP application run, you need your HTTP server to be able to interpret this language. For example, with the Apache server, you have two choices :
- PHP in Apache module
- PHP in CGI
A lot of websites expose the differences between these two methods. By default, Apache server will interpret the PHP code with the "Apache module" method, but you can configure this.
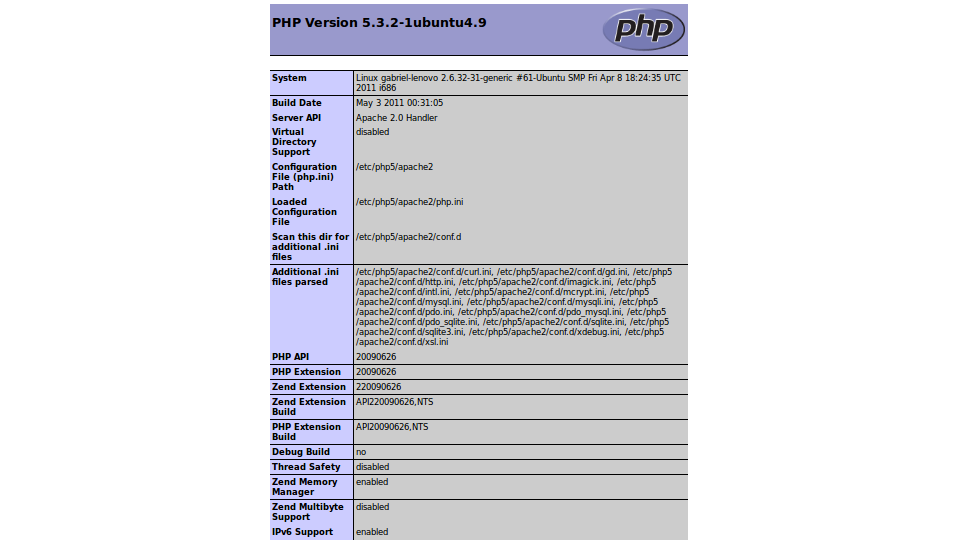
To check that your HTTP server has a good configuration for executing PHP code, you can create a file named phpinfo.php and drop it at the root of your HTTP server:
- c:\wamp\www\ with WAMP on Windows
- c:\EasyPHP\www with EasyPHP on Windows
- /Applications/MAMP/htdocs with MAMP on MacOS
- /var/www on Linux
- ...
In this file, write this :
<?php php_info(); ?>
Then, request the URL http://localhost/phpinfo.php. You should get the following result :
Using VirtualHosts
Virtual hosting is a method which allows for the hosting of several domain names on a physical server by using one IP adress. It allows to run the server's ressources (memory, processor) by sharing them according to each website's needs.
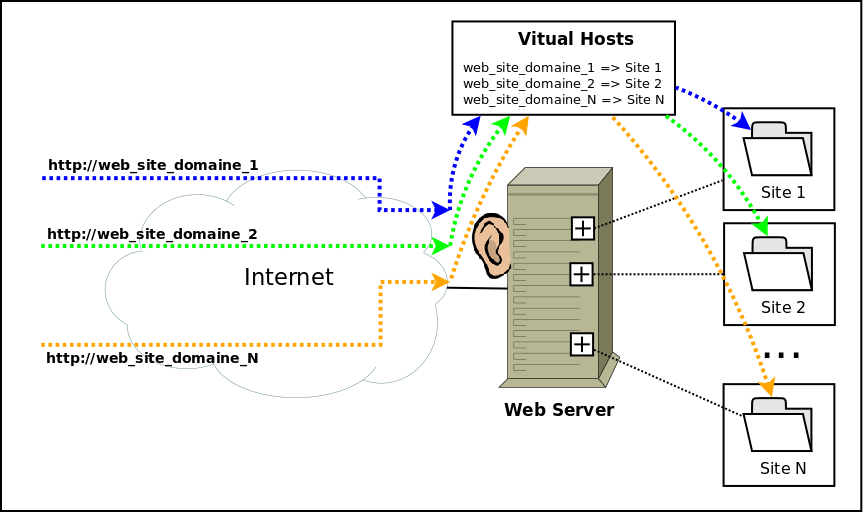
It is also a good practice to implement this when you work locally. It allows you to choose differents domains's names for each of your websites. For example :
- http://mon_site1
- http://mon_site2
- ...
Instead of URLs such as :
- http://localhost/mon_site1
- http://localhost/mon_site2
- ...
Also, this allows you to store websites without respecting a strict arborescence. It's then your responsibility to associate a physical space on the server files's system to a domain name.
Here's an example of a declaration of a Virtual Host for Apache. Replace local.domain with the domain name you want to use, and domain_path with the physical place of the folder containing the files of the website you wish to associate.
ServerName local.domain
ServerAdmin webmaster@local.domain.fr

DocumentRoot /home/user/workspace/domain_path


Options Indexes FollowSymLinks MultiViews
AllowOverride All
Order allow,deny
allow from all

ErrorLog /var/log/apache2/error_local.domain.log
# Possible values include: debug, info, notice, warn, error, crit, alert, emerg.
LogLevel warn
CustomLog /var/log/apache2/access_local.domain.log combined
After each modification on Apache's configuration files, don't forget to restart service, so your new parameters are taken into account.
To restart the Apache service on the Debian system and derivatives (Ubuntu, etc) :
$ sudo /etc/init.d/apache2 restart
or
$ sudo service apache2 restart
Edit a DNS entry locally : add a line in the hosts file
A bit of theory :
The Domain Name System DNS is a service which allows one to establish a correspondence between an IP adress and a domain name. When you enter an URL in your browser, your computer does a name resolution and collects the IP adress associated to the domain you asked for. This IP adress will allow to sent an HTTP request to the correct server. You can also define local couples IP adress / Domain name

During a DNS resolution, your computer will execute differents tasks : * Local resolution : searches if the DNS entry is defined locally. If it's the case, it will use this adress. * If it's not the case, it will perform a distant resolution. The questioned DNS will return the answer if it knows the searched association, otherwise, it will question an other DNS server and so forth until it obtains ... * The answer. The computer which originally made the request will ... * Put the answer in cache for potential future requests and can therefore contact the server related to the wanted domain.
To locally define an association between an IP adress and a domain name, you have to add an entry to the 'hosts' file.
In the case of a local developpment, to associate the adress local.domain to your own machine, ie the localhost. You have to add the entry 127.0.0.1 local domain.
With Debian system and others (Ubuntu, etc) edit the hosts files:
$ sudo vi /etc/hosts
Then, add the IP address / Domain name assocation you want:
127.0.0.1 local.domain
To check that your system has taken the changes in effect, effectuate a ping request. You have to obtain this result :
    $ ping local.domain
    PING localhost (127.0.0.1) 56(84) bytes of data.
    64 bytes from localhost (127.0.0.1): icmp_seq=1 ttl=64 time=0.041 ms
    64 bytes from localhost (127.0.0.1): icmp_seq=2 ttl=64 time=0.033 ms
    64 bytes from localhost (127.0.0.1): icmp_seq=3 ttl=64 time=0.033 ms
    64 bytes from localhost (127.0.0.1): icmp_seq=4 ttl=64 time=0.027 ms
    ....
If you obtain this message:
    $ ping local.domain
    ping: unknown host local.domain
It means that you didn't correctly add the entry in your hosts file.
Configure MySQL
MySQL is a DBMS (Data Base Managment System). It's a free software developped under a double licence according to its utilisation :
- In a free product: general public license (GNU)
- In an owner product: charged licence
For CMS applications like WordPress, Joomla, Drupal, PrestaShop, Magento, etc, you have to inform, during the installation phase, the information concerning the connexion to the MySQL's database.
A good practice is to create a user with defined access on a base, rather than use the same account on every base (for example, the root account). It allows to have better compartmentalization and security. It's not an obligation in a development environment, but it's intensely recommanded in a production environment. For this, you can use the tool phpMyAdmin, easy to reach from a browser, and proceed as follows :


The access URL to your phpMyAdmin is different according to your operating system or your configuration. With Debian system and derivatives (Ubuntu, etc), it is accessible with the URL http://localhost/phpmyadmin.
You could also execute the following SQL requests by replacing user by the user name you want to create and *** by the password:
    CREATE USER 'user'@'%' IDENTIFIED BY '***';

    GRANT USAGE ON * . * TO 'user'@'%' IDENTIFIED BY '***' WITH MAX_QUERIES_PER_HOUR 0 MAX_CONNECTIONS_PER_HOUR 0 MAX_UPDATES_PER_HOUR 0 MAX_USER_CONNECTIONS 0 ;

    CREATE DATABASE IF NOT EXISTS `user` ;

    GRANT ALL PRIVILEGES ON `user` . * TO 'user'@'%';
To sum up, you just created a base named user and a user user with the password user having all rights on this database.
    host: localhost
    nom de la base de donnée: user
    utilisateur: user
    mot de passe: user
This information will be requested during a PHP application's installation that uses the DBMS to store data.
If you need assistance arranging a development environment for your team, or help deploying and migrating your website, you can contact us.